
云浮西门子代理商 CPU模块选型授权代理商
云浮西门子代理商 CPU模块选型授权代理商云浮西门子代理商 CPU模块选型授权代理商
上海西门子授权一级代理商,深圳SIEMEN西门子电源代理商,湖北西门子PLC代理商,荆门西门子触摸屏代理商,上海西门子变频器代理商
,北京西门子交换机供应商,江苏CPU模块代理商,浙江西门子S7-200,S7-300,S7-1500,S7-1200系列代理商,西门子代理商,西门子授权代理商,西门子授权一级代理商,西门子总代理商,西门子触摸屏代理商,西门子触摸屏授权代理商,西门子触摸屏
一级代理商,西门子触摸屏总代理商,西门子变频器代理商,西门子变频器一级代理商,西门子变频器总代理商,西门子变频器授权代理商,
| 6ES72881SR200AA1 | S7-200 SMART,CPU SR20,标准型 CPU 模块,继电器输出,220 V AC 或110 DC供电,12 输入/8 输出 |
| 6ES72881ST200AA1 | S7-200 SMART,CPU ST20,标准型 CPU 模块,晶体管输出,24 V DC 供电,12 输入/8 输出 |
| 6ES72881SR300AA1 | S7-200 SMART,CPU SR30,标准型 CPU 模块,继电器输出,220 V AC 或110 DC供电,18 输入/12 输出 |
| 6ES72881ST300AA1 | S7-200 SMART,CPU ST30,标准型 CPU 模块,晶体管输出,24 V DC 供电,18 输入/12 输出 |
| 6ES72881SR400AA1 | S7-200 SMART,CPU SR40,标准型 CPU 模块,继电器输出,220 V AC或110 DC 供电,24 输入/16 输出 |
| 6ES72881ST400AA1 | S7-200 SMART,CPU ST40,标准型 CPU 模块,晶体管输出,24 V DC 供电,24 输入/16 输出 |
| 6ES72881SR600AA1 | S7-200 SMART,CPU SR60,标准型 CPU 模块,继电器输出,220 V AC 或110 DC供电,36 输入/24 输出 |
| 6ES72881ST600AA1 | S7-200 SMART,CPU ST60,标准型 CPU 模块,晶体管输出,24 V DC 供电,36 输入/24 输出 |
S7-200SMART 实时时钟如何在MCGS触摸屏上显示并写入(案例)附源程序与MCGS画面
给大家带来如何在MCGS昆仑通态触摸屏上显示S7-200SMART PLC实时时间,有些时候,我们想在触摸屏显示PLC实时时间,还要监控PLC才能查看PLC当前时间很麻烦,带大家不用监控PLC直观的在触摸屏上去显示并写入实时时间。
▎一、读实时时钟时间
步:(在桌面打开STEP 7-MicroWIN SMART编程软件)

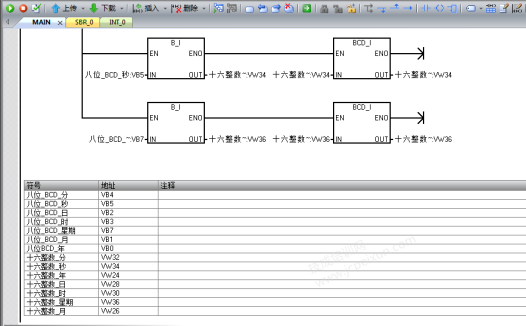
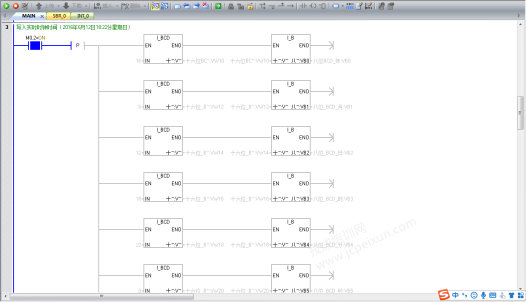
第二步:(用字节转整数 BCD码转整数指令来读取实时时钟时间(B_I—BCD_I
))。


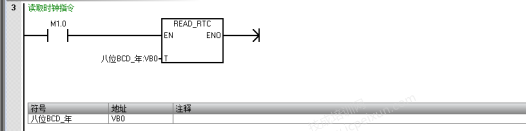
第三步:(读取实时时钟指令(READ_RTC))
二、写时钟时间
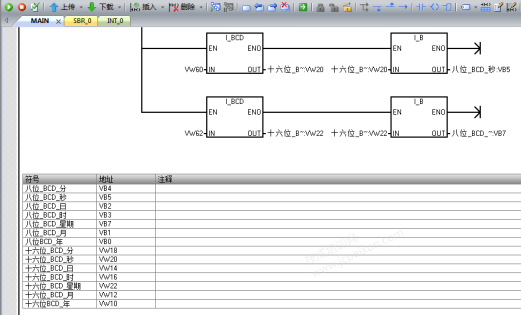
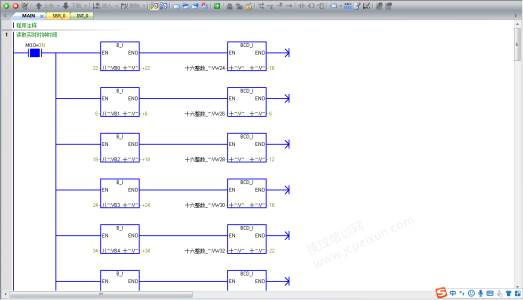
步:(用整数转BCD码 整数转字节来写入时钟设定时间(BCD_I—I_B)
)。

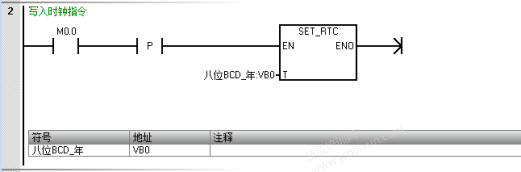
第二步:(设置实时时钟指令(SET_RTC)).
第三步:(监控读取PLC实时时间,当时时间:2020年6月11日15:09星期四)


第四步:(监控写入PLC设定时间,设定时间: 2016年6月12日18:22分星期日)
注意事项:在后第八位表示星期的时候其中1 = 星期日,7 = 星期六,0 = 表示禁止计星期。
▎二、设计触摸屏时间画面
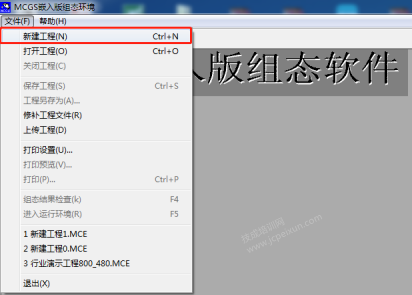
步:(在桌面上打开MCGSE组态环境软件)
第二步:(软件左上角菜单栏—文件—新建工程)
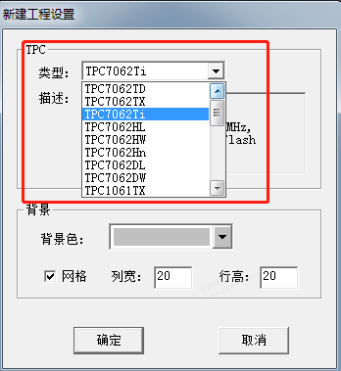
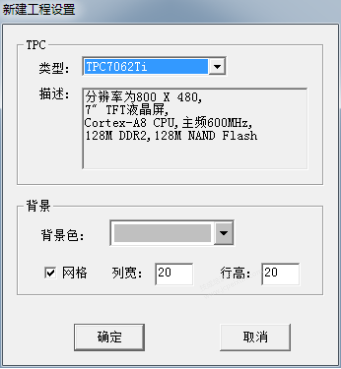
第三步:(新建工程设置—TPC)
类型(选择你设计触摸屏型号)
描述是你选择触摸屏型号的详细信息介绍
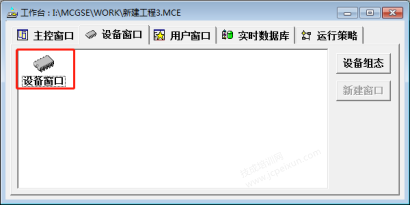
第四步:(打开工作台—设备窗口—鼠标双击设备窗口)
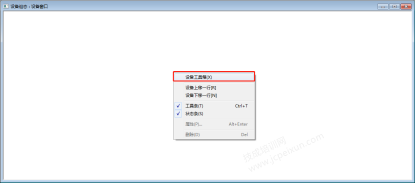
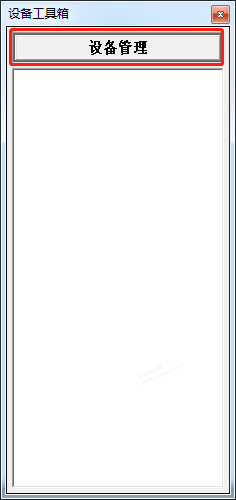
第五步:(打开设备窗口鼠标点击空白处并右击选择设备工具箱)。
第六步:(点击设备管理打开设备组态设置)
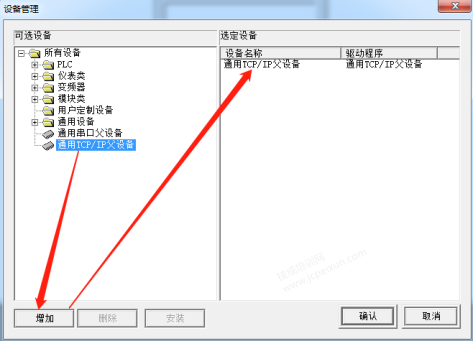
第七步:(选择通用TCP/IP父设备,点击新增,右侧选定设备就会自动添加进去)。
温馨提醒:这里为什么选择通用TCP/IP父设备呢?因为要填加一个主设备,才能填加子设备,这里的子设备是指:通信的PLC、仪表、变频器等!
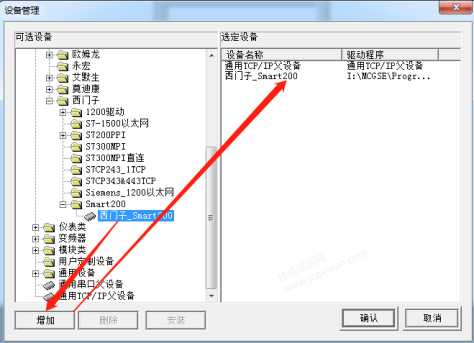
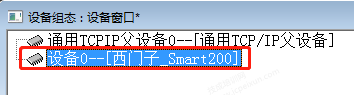
第八步:(鼠标选中西门子Smart200,点击新增,右侧选定设备就会自动添加进去。)
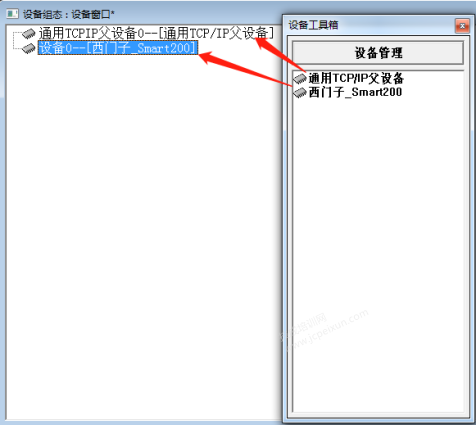
第九步:(设备工具箱—设备管理—鼠标依次点击通用TCP/IP父设备—西门子_ Smart200到设备窗口里面去)。
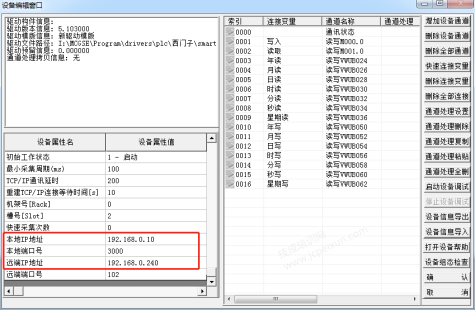
第十步:(鼠标双击打开设备0——[西门子Smart200]进入通信配置)
第十一步:(在设备属性值填写IP地址)
本地IP地址:192.168.0.10里填写触摸屏地址或者电脑本地连接IP地址)
远程IP地址:192.168.0.240填写PLC通信IP地址)
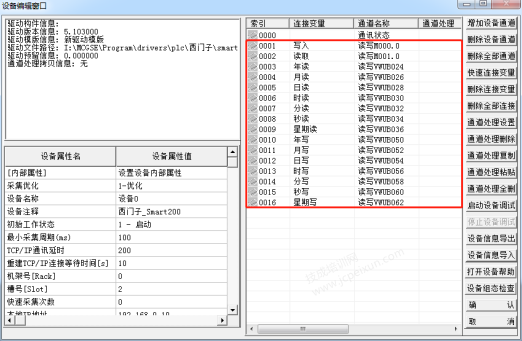
第十二步:(添加设备通道,添加PLC变量地址)。
启动读取与启动写入变量设置如下:
通道类型:M内部继电器
数据类型:第0位(这里是指PLC地址变量小数点后面的位数,例如我地址是M0.5,那么在数据类型应填写通道的第05位)
通道地址:0(这里是指小数点前面位的地址,例如我地址是M1.5,那么应在通道地填写1)。
通道个数:代表连续的位数。
读写方式:选择读写即可。
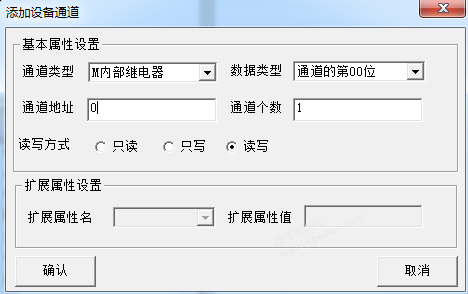
以此类推下去:
M0.0启动写时钟PLC地址
M0.2启动读PLC时钟地址
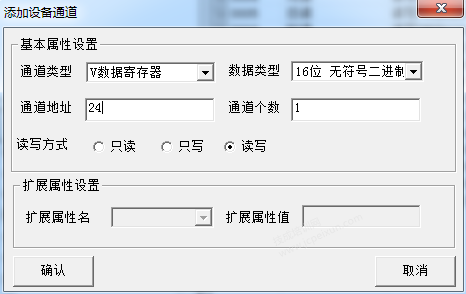
读写时钟变量设置如下:
数据类型:选择16位无符号二进制数(16位等于一个字地址VW)
通道地址:24(通道个数,24代表VW24)。
通道个数:代表连续的个数。
VW24读PLC年
VW26读PLC月
VW28读PLC日
VW30读PLC时
VW32读PLC分
VW34读PLC秒
VW36读PLC星期
VW50写PLC年
VW52写PLC月
VW54写PLC日
VW56写PLC时
VW58写PLC分
VW60写PLC秒
VW62写PLC星期
二、画面设计
步:(用户窗口—新建窗口—窗口1)

第二步:(双击打开窗口1,设计如下图S7-200SMART PLC 实时时钟时间(读取)画面)
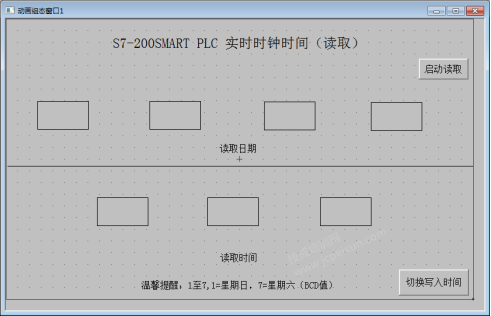
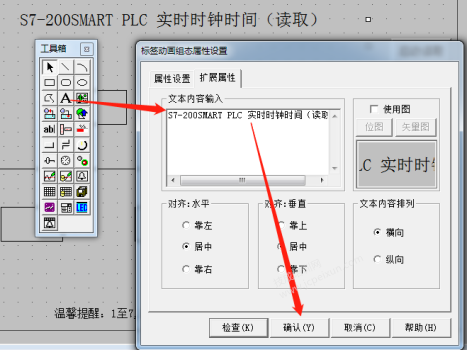
1.使用标签功能来编写文字标题,如下图所示:
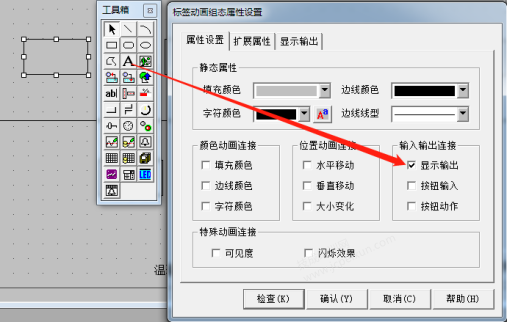
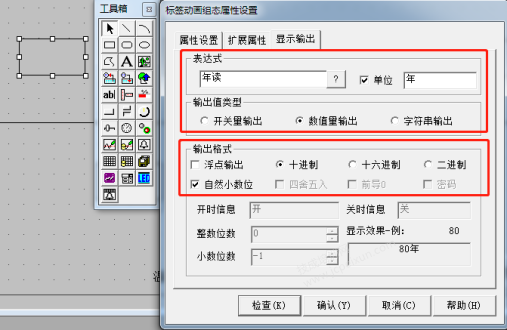
2.使用标签在属性设置输入输出连接勾线显示输出,后点击显示输出表达式关联PLC读地址,单位输入年,当然月就是输入月,根据地址定义,输出值类型选择数值量输出,输出格式选择十进制数,自然小数点,如下图所示:
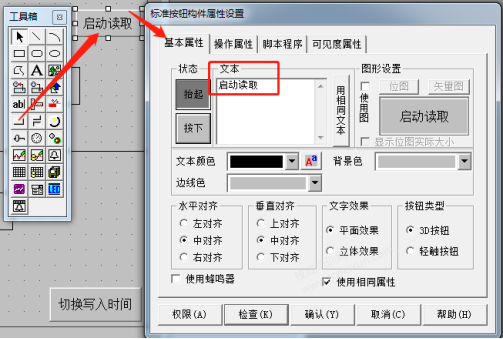
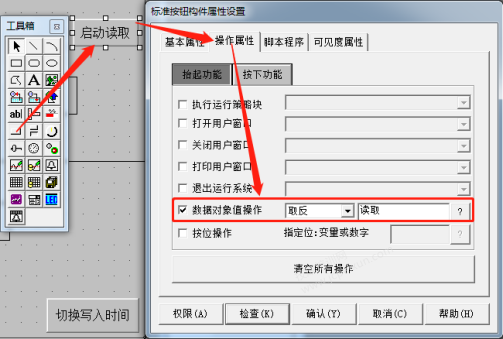
3. 使用标准按钮设置启动时钟读取按钮,在基本属性文本写入启动读取,操作属性—勾选数据对象值操作—取反,点击问号关联PLC变量地址。
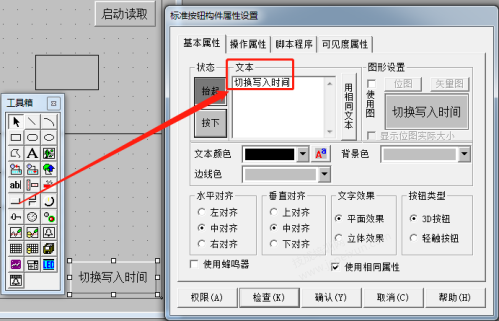
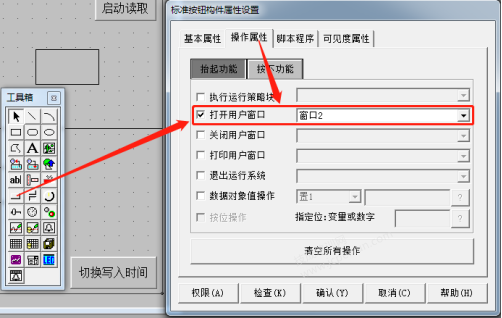
4. 使用标准按钮设置切换写入时钟画面,在基本属性文本写入切换写入时间,操作属性—勾选打开用户窗口选择窗口2。
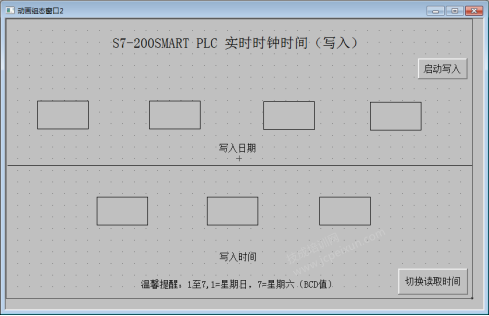
第三步:(双击打开窗口1,设计如下图S7-200SMART PLC 实时时钟时间(写入)画面)
写入画面设计与读取设计是基本是一致的,大家可以参考读取来以此类推。
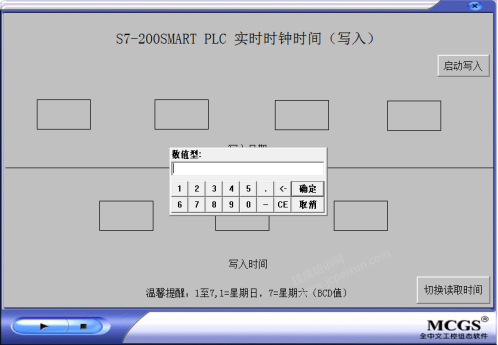
三、 演示效果
步:(点击模拟运行—工程下载—启动运行)

云浮西门子代理商 CPU模块选型授权代理商 云浮西门子代理商 CPU模块选型授权代理商